A coding demo can move from a harmless function to a configuration file in a single click. The same value may also appear in terminal output, a browser dashboard or a preview page. Preparing only the editor leaves other places to check.
The safest starting point is a demo that contains no production credentials. Then reduce what is captured, rehearse the exact workflow and inspect the final recording. Visual masking can add protection, but the setup still needs to be checked.
Build a disposable demo
Create a separate demo project or a clean, sanitized copy. Avoid copying a production .env file and replacing just the values you expect to show: old files, logs and configuration variants can remain. Use fixtures and a mock service when a live connection is unnecessary.
For an explanation of environment variables, an example file can be as simple as this. Every value below is invented and inert; none is a real credential or service endpoint.
# .env.example - fictitious teaching data only
DEMO_MODE=true
API_TOKEN=NOT_A_REAL_TOKEN_DEMO_ONLY
DB_PASSWORD=FAKE_PASSWORD_FOR_SCREENSHOT_ONLY
API_BASE_URL=https://api.example.invalid
Do not expect these obvious placeholders to exercise every secret detector. A detector may require a provider-specific format, length or surrounding context. Use documented synthetic fixtures for detector testing, and keep them separate from a realistic-looking credential that someone could mistake for a live key.
If the demo genuinely requires a working service, use a dedicated test environment and appropriately restricted access. Keep the credential out of the captured surface. Do not assume that a value is safe to broadcast merely because it is labelled “test”.
Keep repository safety separate
A .gitignore rule affects which untracked files Git considers for tracking; it does not conceal an open file on screen, and it does not remove already tracked files. Check what is actually tracked before sharing a repository. Screen masking likewise does not remove secrets from commits, logs or downloadable files. See the Git documentation on gitignore and GitHub’s guidance on sensitive data.
Inspect every surface in the capture
Before recording, walk through the demo in order. Write down each place where data appears, including the steps between the parts you intend to explain.
- Editor: open tabs, split panes, search results, diffs, hover cards and inline suggestions.
- Terminal: command history, startup logs, stack traces, copied commands and environment-variable output.
- Browser: address bar, account menus, dashboards, developer tools and downloaded files.
- Preview: rendered pages, error overlays, application logs and debugging panels.
- Desktop: notifications, window switching, recent-file lists and unrelated applications.
This is a checklist of potential exposure paths, not a claim that PixelHush does or does not support each one. Treat anything you have not tested as outside the verified scope.
For prerecorded material, select the smallest capture area that tells the story. Close unrelated windows and use synthetic account names and data. For live sharing, inspect the meeting app’s selected source before participants can see it. Keep private files out of the workflow altogether.
Use masking within its documented scope
PixelHush’s website describes a macOS agent with extensions for VS Code, Cursor, Windsurf and Antigravity, plus a Chromium browser extension. Its FAQ lists .env and several configuration formats in the automatic recording flow; some source-file formats require manual masking. Check the current compatibility details for your exact recorder and file type. See the PixelHush documentation.
The site says editor masking changes the display rather than the file contents. Copying a masked value can therefore still expose its original text elsewhere. Browser support is a separate integration: an editor extension should not be assumed to cover a browser preview, terminal or another app. See the PixelHush documentation.
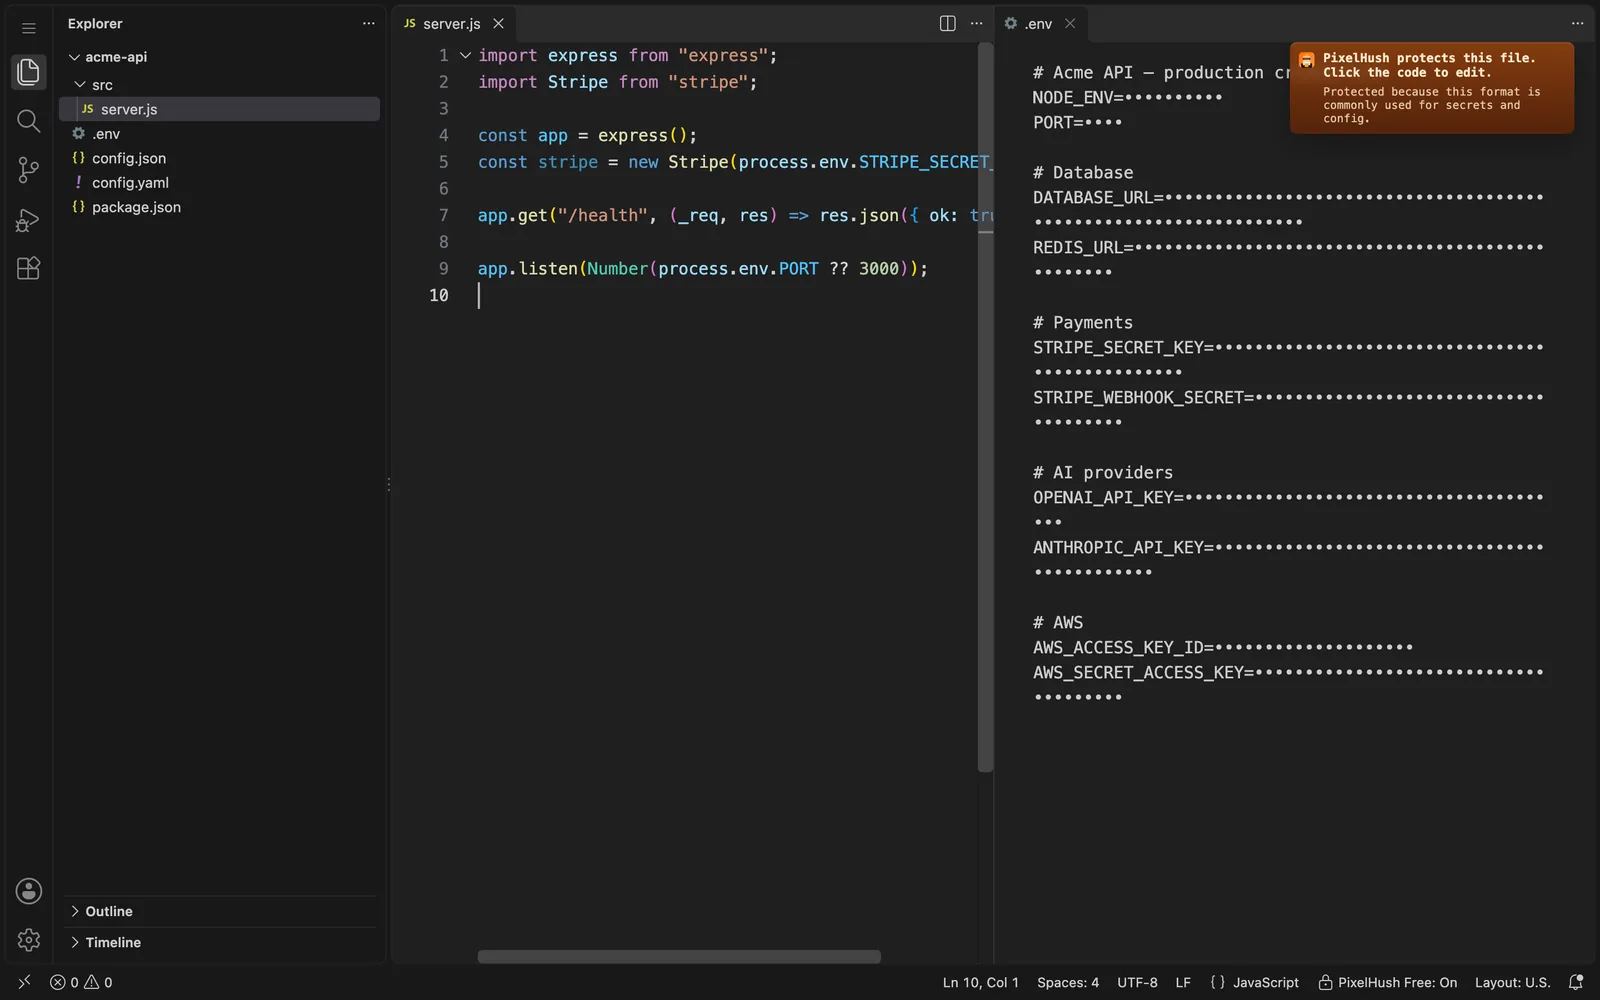
.env file is shown in a protected view, while server.js stays readable.A short PixelHush demo is available as an illustration. Use your own test recording to check the behavior in your setup.
Rehearse the recording itself
Make a short private recording using only synthetic data. Start from the same app state and use the same capture source as the real demo. Include opening a file, scrolling, switching tabs, moving to the browser, stopping and restarting recording, and changing the shared window if that is part of your plan.
Watch the saved video rather than relying only on the screen you saw while recording. Pause around transitions and inspect whether anything becomes readable before or after masking changes. If an untested surface is necessary, replace its contents with fake data or leave it out of the capture.
Review before uploading
A successful rehearsal is useful evidence for that setup. It is not a permanent guarantee: changing a recorder, extension version, capture mode or application can change the result. Repeat the small check when your workflow changes.
For a prerecorded tutorial, review the exported file at readable resolution. Pay attention to the opening frames, window transitions, error messages and the final frames. Check thumbnails, screenshots, captions and any downloadable project separately. An edited video may be clean while another asset still exposes information.
If you discover a real credential in a recording, stop distributing that version. Revoke or rotate the credential through its provider, check relevant access or usage records, and then replace the exposed media. Removing a video cannot make a credential secret again once someone may have copied it. GitHub likewise identifies revocation or rotation as the first step when a credential is exposed in a repository. See GitHub’s guidance.
A checklist to keep beside the recorder
- Use a clean demo project, fake values and non-sensitive fixtures.
- Confirm that any necessary live services use a separate test setup.
- Inspect editor, terminal, browser, preview and desktop surfaces.
- Check the selected capture source and rehearse transitions.
- Verify masking in the saved test recording, using synthetic fixtures.
- Review the exported video and every accompanying asset.
- If a real secret appears, revoke or rotate it and replace the affected material.
You can use this workflow with or without PixelHush. The useful habit is making the recording reproducible: a small demo project, a known capture path and a final review. Add masking where it helps, and keep working credentials away from the material you plan to show.